This interior perspective showing the Philips LED Livingcolours illuminating the room a pinkish colour, whilst the Yellowbird 360 technology shows a 360 video on the walls. This is an improvement from my last 360 room proposal as the walls in this room are actually round, 360 degrees from the center of the room.
This perspective shows the relation of the building and its surroundings
Wednesday, 15 June 2011
Ventilation
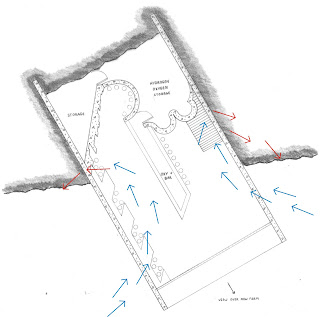
Ventilation is a must in a building that is half covered in a rock wall. These diagrams show how the building takes in the cool breezes that come from the Brisbane River and circulate them through the building and then vent out through the sides of the building out of the rock face.
Tuesday, 14 June 2011
Section
This section shows how the cantilevered building structurally works. Each level has about 60% of the structure fixed within the rock face, aswell as an even space between one level and then next.
Floor Plans
After a lot of thinking and sketches I got some floor plans from the graphics used. Notice how most of the rooms and clutter of the plans are at the rear of the levels. This is so not to clutter and block the window at the front of the building that allows people to see the magnificent views. Another thing to notice is that the windows are all set back 2 metres. This helps the frame the views that each level is facing. Without this, people inside the building would be able to come right up to the window and see almost 90 degrees to where the level is facing.
first floor
second floor
third floor
first floor
second floor
third floor
Site Plan and Roof Plan
The actual location of my building on the site has been moved over. This is because it was sitting directly under the bridge getting no sunlight. The building has been moved to the east side of the bridge, therefore the photovoltaic panels can recieve most of the morning and afternoon sun.
The roof plan shows the buildings as one, showing the diferent directions in which each floor are pointing.
The roof plan shows the buildings as one, showing the diferent directions in which each floor are pointing.
Thursday, 9 June 2011
Floor Plan Process
Here are some sketches of my process of working out a floor plan using these graphics as a floor. I am trying to leave the front of the building less cluttered as to not block any views.
third floor
first floor
second floor
third floor
first floor
second floor
Wednesday, 1 June 2011
Nikki Farquharson
I've been struggling with designing my new floorplan. Iv'e been look at graphic design to try to get some cool and interesting shapes into my plans. One graphic designer that I find very cool and interesting is Nikki Farquharson. Her artwork and design usually involves model standing in some cool matrix of colours and shapes. This is where the FLoor Tech technology comes in. With this Floor Tech product and some imagination it is now possible to have such cool designs as flooring. So with these images I can already start to see a floor plan possible, it is just a matter of actually sitting down and doing it. I've left a link to Nikki Farquharson's website at the bottom of this post.
http://www.nikkifarquharson.com/home.php
http://www.nikkifarquharson.com/home.php
Floor Tech
It’s not really an emerging technology, but this company Floor Tech in the UK have a product called sportgaurd floor seal. This is a polyurethane product that is used to seal hard flooring such as concrete. Sportguard has excellent tractional properties combined with a tough durable finish, which would be perfect for my building as people will be constantly dancing on it. It is also 100% waterproof. It’s not directly on their website, yet these polyurethane floor seals can be coloured. The reason for this is I am thinking of putting images or shaped or colours or something on the floor of my building to not only give it a more vibrant interior, but also to distinguish different areas of a level.
Subscribe to:
Comments (Atom)


